


Instructions for replacing brake discs and pads: EV KIT
Please read and follow all instructions carefully. You’ll find the same instructions in the brake disc and pad pack. Remember to keep them for the entire product life cycle. Hand them over to the new owner if you sell your vehicle.
The instructions are just general guidelines, as brake discs may differ from those illustrated below.
CAUTION!
Brembo EV Kit discs and Brembo EV Kit pads must always be fitted in combination with one another. Combining them with different products could jeopardise the proper functioning of the KIT.
The instructions are just general guidelines, as brake discs may differ from those illustrated below.
CAUTION!
Brembo EV Kit discs and Brembo EV Kit pads must always be fitted in combination with one another. Combining them with different products could jeopardise the proper functioning of the KIT.
Replacement procedure
Here is the procedure for replacing the brake disc for one wheel. You will have to repeat all the steps on the other wheel on the axle too.
The procedure described is for one wheel, and must be repeated on the other wheel of the axle.
The procedure described is for one wheel, and must be repeated on the other wheel of the axle.
1. Remove the wheel
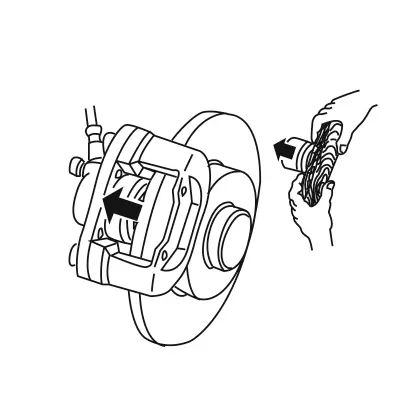
2. Remove the pads and pull back the piston(s). Use the dedicated tool!
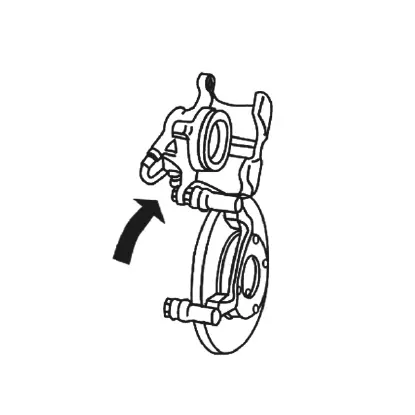
3. Remove the caliper from its mount
DANGER! Do not disconnect the brake fluid supply line from the caliper. Suspend the caliper, making sure the supply line is not pulled taut.
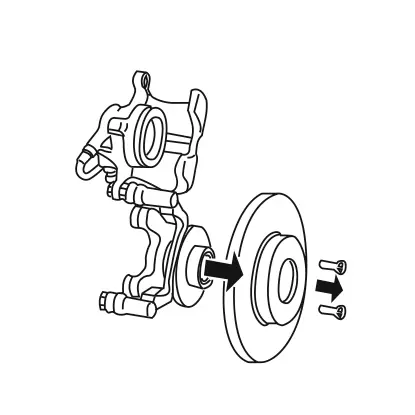
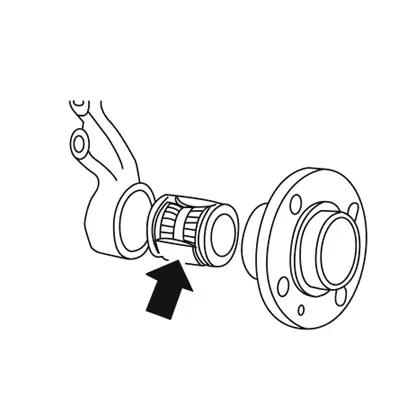
4. If necessary, disassemble the wheel hub before removing the disc. Then disassemble the brake disc.

5. Clean the mounting face on the new disc.
WARNING! Do not soil the mounting face with oil or grease.
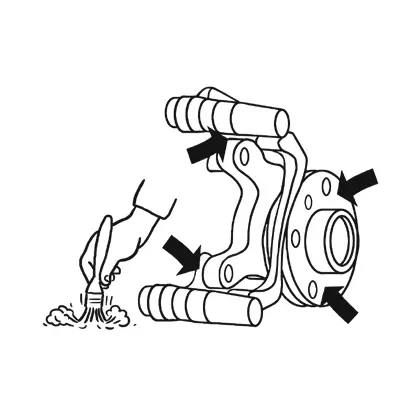
6. Thoroughly clean the disc mounting face on the wheel hub, removing any deposits and rust; check that the surface is not damaged or deformed, and restore it to the proper condition if necessary.
7. Check for smooth rotation and correct end float of the wheel bearings.
8. If the wheel hub has not been removed: fit the new disc to the wheel hub and secure with the fastening screw; adjust the bearing where required, following the vehicle manufacturer’s instructions.
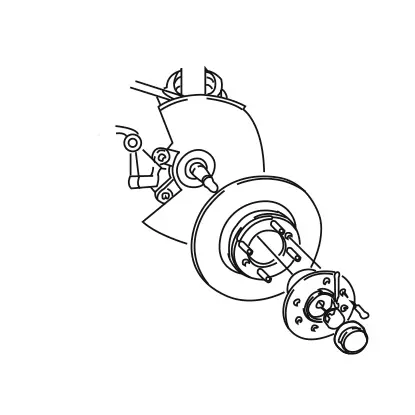
9. If the wheel hub was removed in step 4: assemble the hub and disc, tightening the fastening screws at the specified torque. Fit the hub-disc assembly onto the wheel axle, adjust the bearing and complete fitting operations according to the vehicle manufacturer’s instructions.
Read the article about the correct tightening torque.
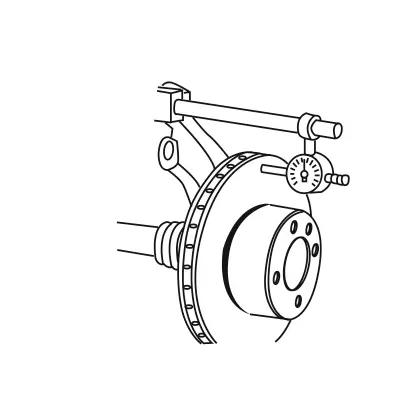
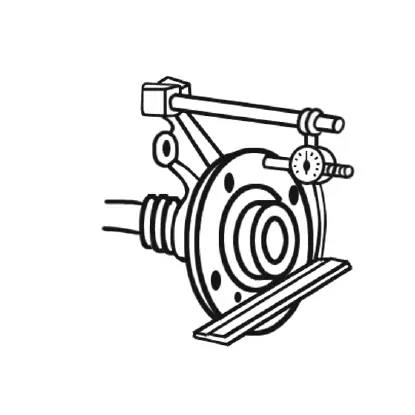
10. Check lateral runout of the disc using the metrology kit; the dial gauge must be positioned as illustrated, 5mm from the outer diameter. Secure the disc with a number of wheel nuts to simulate the condition in which the wheel is mounted. The maximum value of runout per full revolution of the disc is: 0.10 mm for cars - 0.12 mm for commercial vehicles. If necessary, remove the disc and refit it to the wheel hub in a different position, then repeat the measurement.
WARNING! Conduct this test with care. A runout value higher than indicated will lead to abnormal wear and generate vibration when braking.
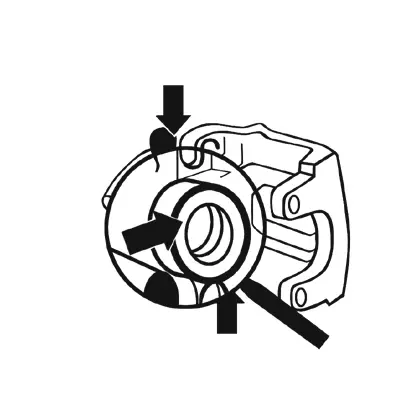
11. If the runout measurement is unacceptable, measure the runout of the wheel hub mounting face; if necessary, replace the hub and refit the disc.
WARNING! The permissible runout value for the wheel hub mounting face is approximately half that specified for the disc.
12. Refit the caliper to its mount; in the case of a floating caliper, check for smooth sliding action of the body on the guides.
CAUTION! Check that rubber parts are not damaged. Replace if necessary.
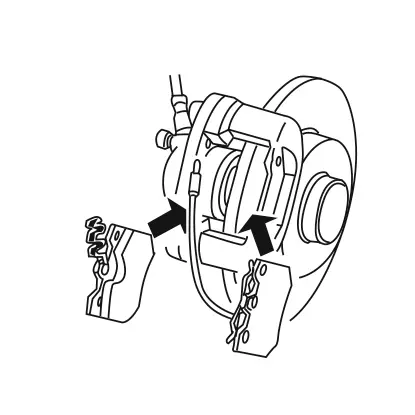
13. Fit the new pads, with the related springs and pins. Grease the back and edges of the pads where indicated. Connect the wear indicator, if installed.
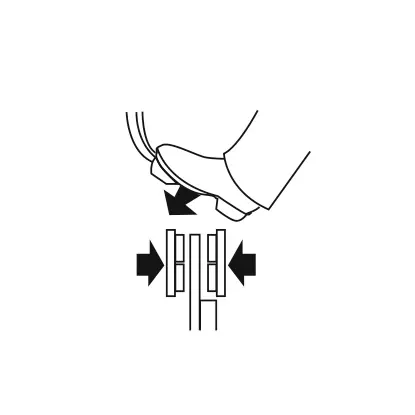
14. Operate the pedal to bring the pads closer to the disc. Repeat this process until the pedal travel is as it should be.
15. Check the level of brake fluid in the reservoir, topping up if necessary.
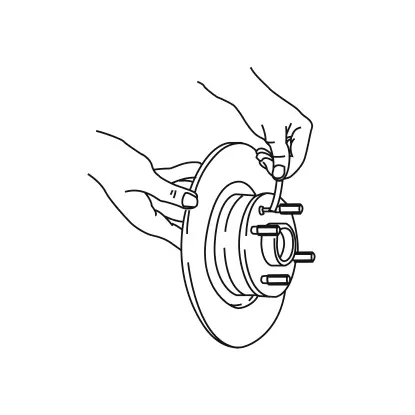
16. Refit the wheel and tighten the wheel nuts as indicated by the vehicle manufacturer or as in the Brembo catalogue.
17. Balance the wheel.
Testing and running in
Road test the vehicle, taking care not to stab at the brakes or keep the pedal depressed for more than 3 seconds; make sure there is no noise or vibration from the brakes.
The user of the vehicle should run in the new discs and pads for at least 200 km, applying the brakes gently and sparingly, and without activating the ABS.
The user of the vehicle should run in the new discs and pads for at least 200 km, applying the brakes gently and sparingly, and without activating the ABS.
CAUTION! If new brakes are not properly run in, the braking system could be prevented from operating efficiently.
Important general statements
Brake pads are part of the braking system and as such are safety critical parts. All work must therefore be carried out with the utmost care. Brake pads must only be replaced by persons possessing the necessary expertise. Incorrect work may lead to total failure of the braking system.
Replacement procedure
Before you start working on the braking system, attach a warning notice to the steering wheel to indicate that the vehicle is under repair, chock the wheels not being worked on, jack up the vehicle and ensure its stability.
We recommend you start replacing the pads on one side of the axle at a time.
The second brake may serve as a guide for the correct positioning of the individual parts during reassembly.
We recommend you start replacing the pads on one side of the axle at a time.
The second brake may serve as a guide for the correct positioning of the individual parts during reassembly.
WARNING! Springs/clips holding down the pads may be under spring tension; relieve in a controlled fashion and keep in place using the caliper body.
Do not operate the brake once the pads have been removed.
Here is the procedure for replacing brake pads:
a) without disassembling the caliper;
b) with partial disassembly of the caliper.
a) Pad replacement without disassembling the caliper: for Fixed caliper (Fig.1) and Floating Caliper, if the pad can be removed from the top (Fig.2).
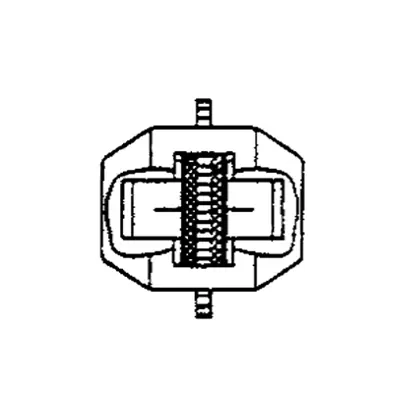
Fig 1. Fixed caliper
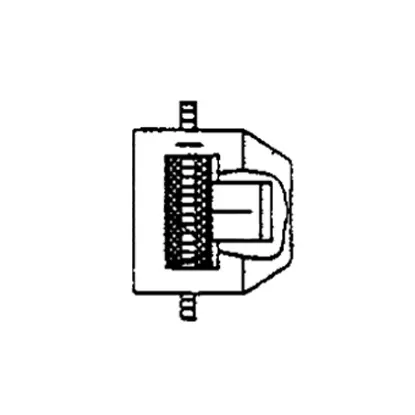
Fig 2. Floating caliper
1. Remove the cover plates, where present.
2. Disassemble the safety devices such as retainer pins, clamping sleeves, springs or screws used to secure the brake pads.
3. Disconnect the wear indicator connector, where present.
2. Disassemble the safety devices such as retainer pins, clamping sleeves, springs or screws used to secure the brake pads.
3. Disconnect the wear indicator connector, where present.
WARNING! Avoid any leaks of the brake fluid in the fluid reservoir and drain some if necessary. If inappropriately handled, brake fluid may cause serious injury or damage. Observe the brake fluid manufacturer’s instructions scrupulously.
4. Use an expansion tool to push the pads backward, if necessary.
5. With fixed calipers, pull the pads out of the caliper body.
6. With floating calipers, start by disassembling the brake pads on the piston side, then shift the sliding caliper until the other pads can be removed from the pin (where relevant).
7. Remove any shims and replace with new ones if damaged. Do not disassemble any accessories secured to the brake piston. These must be repaired professionally by an authorized workshop only, according to the vehicle manufacturer’s instructions.
b) Pad replacement with partial disassembly of the caliper: for fist caliper. If pad removal from the top is not possible, see Fig. 3.
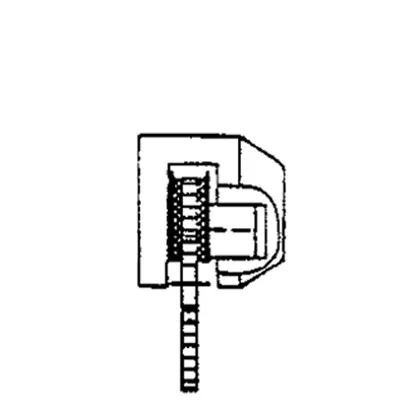
Fig 3. Fist caliper
1. If a wear indicator is provided, disconnect the connector.
2. Depending on the caliper configuration, disassemble locking springs, fastening screws, guiding pieces or bolts.
2. Depending on the caliper configuration, disassemble locking springs, fastening screws, guiding pieces or bolts.
WARNING! Avoid any leaks of the brake fluid in the fluid reservoir and drain some if necessary. If inappropriately handled, brake fluid may cause serious injury or damage. Observe the brake fluid manufacturer’s instructions scrupulously.
3. Push the piston back and pivot out or remove the caliper body. Do not detach the brake tubes.
4. Support or suspend the removed caliper body in such a way that the brake tubes are not stretched or damaged.
5. Remove the brake pads from the caliper body or stirrup.
Subsequent steps
1. To make the new brake pads fit into the caliper, push the piston back.
2. With 4-piston fixed calipers or 2-piston fist calipers, insert shims to prevent pistons from coming back out while the other pistons are pushed back.
3. With calipers which combine a mechanical parking brake and brake clearance adjustment feature, the piston must be brought back to its original position by turning it or by means of an adjustment screw, depending on the type of caliper.
4. Clean the stirrup, caliper body and guides with non-mineral-oil based cleaning agents. Replace damaged or brittle dust caps.
CAUTION! Do not clean components of the braking system with compressed air, a stiff brush or similar. Do not raise fine dust which, if inhaled, can be harmful to health. Wear a respirator, if working in a poorly ventilated area. Do not degrease guides and caliper spring assemblies, as they require special grease. When the caliper has difficulty sliding, slightly grease the sliding surfaces with special grease according to the instructions provided by the vehicle or caliper manufacturer. The friction materials of the brake pads and discs must not come into contact with the greases used, as this could lead to brake failure; if this should happen, degrease the discs and use new brake pads. Replace corroded guides.
5. With stepped pistons, check the correct position using dedicated piston gauges and readjust, if necessary.
6. Check brake disc thickness and replace all discs on an axle if the wear limit is exceeded or if heavy surface crazing or cracks are found.
7. Remove any corroded areas on the outer and inner parts of the disc braking surface.
Fitting procedure
1. The new brake pads must move freely in their guides.
2. The contact surfaces of the pad metal backing plate/caliper guides as well as of the pad metal backing plate/brake pistons are to be slightly greased with a special grease according to the vehicle manufacturer’s instructions.
3. Shims which are not corroded, bent or embedded may be reinstalled.
4. If the wear indicator is envisaged, reconnect the new sensor or the existing one if it is not damaged.
5. Insert the new brake pads in the reverse order as described under “Replacement”, with the friction surface pointing towards the brake disc. With asymmetrical brake pads, the arrow must point in the direction of rotation of the disc (in forward gear).
6. Insert locating pins, springs and clamping sleeves in their original position before being disassembled.
7. If the brake pads are equipped with wear indicators, re-connect plugs and sockets.
8. Tighten the fastening screws or guiding pins. Replace self-locking screws with new ones of the same type.
WARNING! Observe the tightening torque recommended by the vehicle manufacturer. An incorrect tightening torque may induce braking system failure.
9. Brakes combined with a mechanical parking brake clearance adjustment feature must have free travel after repeated brake actuations. Follow the instructions provided by the vehicle manufacturer.
10. Replace the pads on the other end of an axle in the same way.
Functional test
Once you have re-fitted the wheels and lowered the vehicle, be sure to observe the following points:
1. Check the brake fluid level in the reservoir and replenish to maximum filling line, if necessary. Use only new brake fluid of the grade specified for the particular vehicle type.
WARNING! If inappropriately handled, brake fluid may cause serious injury or damage. Observe the brake fluid manufacturer’s instructions.
CAUTION! To re-position the brake pads correctly, repeatedly operate the brake once the vehicle is back on the ground.
Repeat this process until the brake pedal travel has stabilised at approx. one-third of its total travel. At a constant maximum pedal force, the pedal travel must not change even over a prolonged period of application.
CAUTION! If the pressure point and consistency cannot be achieved, recheck the entire braking system, as otherwise the risk of a brake failure cannot be ruled out.
Recheck the braking system for leaks.
2. Recheck the brake fluid level and replenish up to the maximum filling line, if necessary. Use only new brake fluid of the grade specified for the particular vehicle type.
WARNING! If inappropriately handled, brake fluid may cause serious injury or damage. Observe the brake fluid manufacturer’s instructions. Perform trial brake applications at low speeds keeping in mind that brake effectiveness may be somewhat reduced during the first brake applications. Do not apply excessive force or perform continuous brake applications in order to achieve faster brake disc pad running-in.
3. Always observe the running in instructions provided by the vehicle manufacturer.
4. Observe traffic regulations when performing brake tests.
5. Carry out a functional test on a rolling road to ascertain that the system meets any legal requirements.
General and safety information
This Brembo product has been designed to comply with all applicable safety standards. Products are not intended to be used differently from the specific use for which they have been designed and manufactured. Use for any other purpose, or any modification to or tampering with the Product can affect the performance of the Product and may render the Product unsafe.
Such modification or improper use will void the Limited Warranty, and may subject the individual so using the Product to liability for bodily injury or property damage to others.
Brake pads are subject to wear and must therefore be checked at regular intervals.
If the thickness of friction material remaining on a pad is less than 2 mm or the wear indicator lights up, replace all the pads on an axle.
If the thickness of friction material remaining on a pad is less than 2 mm or the wear indicator lights up, replace all the pads on an axle.
Brembo EV KIT discs and Brembo EV Kit pads must always be fitted in combination with one another. Combining them with different products could jeopardise the proper functioning of the KIT.
DANGER!
Before commencing replacement, ascertain that the spare parts are suitable for the make and model of the vehicle. This Product is vital to the safe operation of the vehicle on which it is installed, and it is intended to be installed only by a skilled, qualified individual who has been trained and/or is experienced in the installation and use for which the Product is intended.
The installer must be equipped with the proper tools of his trade, and with the knowledge and experience to deal with vehicle repairs. Improper or incorrect installation, whether caused by a failure to follow these Instructions faithfully and completely or otherwise, will void the Limited Warranty and could subject the installer to liability in the event of personal injury or property damage.
It is essential that you replace the brake discs for each axle, taking them from the same box. Every time you replace the discs also replace the related pads.
Avoid contact of grease and other lubricants with the braking surfaces of the disc and pads as this could affect the efficiency of the braking system.
Brembo shall not be liable for any damage or injury caused to or by any person operating a vehicle on which a replacement product has been improperly installed.
CAUTION!
Replaced parts must be disposed of in accordance with the law.
It is vital to avoid sharply striking and/or damaging the Product, its parts and its components, as this can impair their efficiency and may cause them to malfunction. If necessary, replace any damaged part or component. To avoid injury we recommend the following:
It is vital to avoid sharply striking and/or damaging the Product, its parts and its components, as this can impair their efficiency and may cause them to malfunction. If necessary, replace any damaged part or component. To avoid injury we recommend the following:
- Always wear gloves during disassembly and assembly of components with sharp edges.
- Do not allow skin surface to make direct contact with the friction material of pads and brake shoes since this could cause abrasions.
- Do not bring the friction material of the brake pads, discs, calipers, brake tubes, etc. into contact with greases, oils, other lubricants or mineral-oil based cleaning agents as this could lead to brake failure. If necessary, replace any parts which became contaminated. Brake pads must be replaced in axle sets.
- Do not use any sharp tools, as inappropriate use of these might cause damage. Use special tools only (torque spanner, expanding tool, pull-out hooks, etc.).
- Should damage be observed on any part of the braking system while working on it, it must be remedied appropriately.
Warranty limitations
This warranty covers all the conformity defects occurring within two years from delivery of the good. The consumer is required to report to the seller the conformity defect within two months from the date of discovery of the said defect, without prejudice to the fact that the limitations period for taking action aimed at seeking redress for the defect is twenty-six months from delivery of the good. In the event of a conformity defect, the user has the right to repair or replacement of the good, or to an appropriate price reduction or termination of the contract, as established by art. 130 of the Consumer Code, where applicable.This warranty constitutes the only warranty provided in relation to this product and replaces any other warranties, both verbal and written.
Is there anything else you want to ask?
Contact the Brembo technical support team. Our technicians will get back to you as soon as possible!